 bluename
 How to Grow Caladium Textured Leaf: Unique Texture Care Guide
I killed three caladiums before I figured out how to grow a caladium textured leaf that actually keeps its bold, quilted pattern indoors. The secret, honestly, is not water, humidity gadgets, or fancy fertilizer. It's restraint. If you want that thick, leathery, painted look on the leaves, you need to stop treating it like a tropical fern and start treating it like a bulb that hates wet feet. I'm writing this after two straight weeks of daily observation on my own 'White Queen' and 'Red Flash' plants, and I'll give you the exact steps, the ugly mistakes, and the fixes that worked.
Let's get one thing straight right away: 90% of indoor plants die from overwatering. That's not a scare tactic. It's what I see in every plant group I'm in. Caladiums are tubers, not true houseplants in the traditional sense, and a soggy tuber rots faster than you can say "why is my leaf drooping." So before we talk texture, we talk drainage and light.
What "Textured Leaf" Actually Means on a Caladium
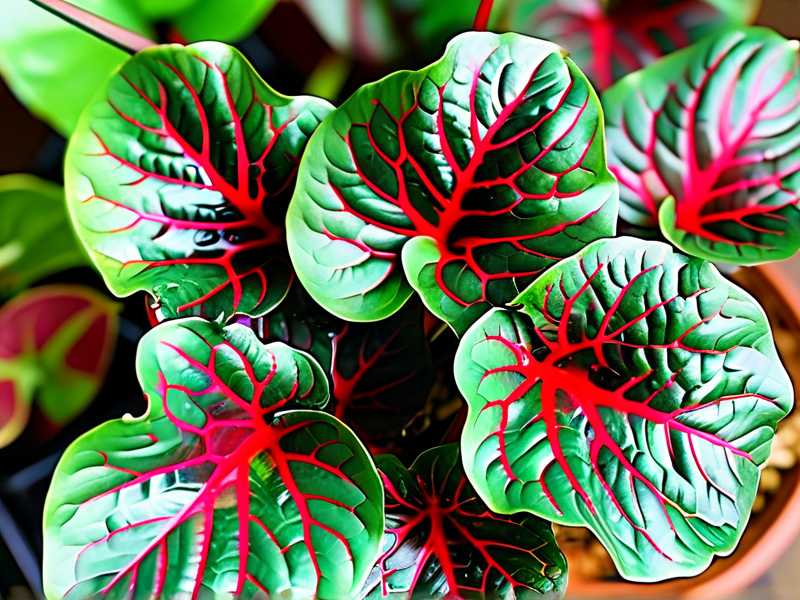
When I say textured leaf, I mean the fimbriated, ruffled, or heavily veined look that makes caladiums stand out. Some varieties have a puckered, corrugated surface. Others have a papery, matte finish with deep red veins. The texture is genetic, but it only shows up properly when the plant gets consistent light and never sits in waterlogged soil.
If your caladium leaves come out thin, flat, and washed-out, the texture is there but hidden. It's like a photo with the contrast turned way down. The plant is surviving, not thriving.
The Three Deadly Mistakes I Made (So You Don't Have To)
Mistake #1: Overwatering. I watered my first caladium every three days because the soil looked dry on top. The tuber turned to mush in ten days. The leaves went yellow, then limp, then gone. I tried to "save" it by watering more. That was the worst thing I could do.
Mistake #2: Wrong light. I put my second caladium in a dark corner because I read they like shade. True, they don't want harsh afternoon sun, but "shade" in a dim living room is not the same as dappled shade under a tree. The leaves grew long, thin, and green. No texture. No color. Just a sad, stretching stem.
Mistake #3: Wrong pot. I used a decorative ceramic pot with no drainage hole. I thought I was being careful with water. I wasn't. The bottom inch of soil stayed wet forever. That's where the tuber sat. Rot again.
I'm not proud of this track record. But it taught me more than any perfect success story would.
The Fix: My 2-Week Step-by-Step Routine
I started fresh with a 'Red Flash' tuber in early spring. Here's exactly what I did, and what I saw each week.
Week 1: Planting and First Signs
I used a 6-inch terracotta pot with a drainage hole. Terracotta wicks away moisture, which helps a lot if you're an overwaterer like me. I filled it with a chunky mix: two parts peat-free potting soil, one part perlite, one part orchid bark. The bark is key. It creates air pockets so the tuber never sits in a wet sponge.
I planted the tuber with the "eyes" (little bumps) facing up, about 1.5 inches deep. I watered once, thoroughly, until water ran out the bottom. Then I didn't water again for seven days.
I placed the pot near an east-facing window. That gives bright, indirect morning light. No hot afternoon sun. I checked the soil with my finger every day. It stayed slightly damp but not wet.
By day 6, I saw a tiny pink nub pushing through the soil. Day 8, a tight spear. That's when I knew the tuber was alive.
Week 2: Leaf Emergence and Texture Check
The first leaf unfurled on day 11. It was small but already showed the deep red veins and a slightly ruffled edge. The texture was there, but it wasn't dramatic yet.
I watered on day 12, only because the top inch of soil was dry. I gave it a light soak, not a drench. I also rotated the pot a quarter turn so the leaf would grow straight toward the light.
By day 14, a second leaf was emerging. This one had a thicker, more leathery feel. The surface was puckered. That's the textured leaf I was after. The difference came from consistent light and never letting the soil go from dry to soaked. I kept it evenly moist, like a wrung-out sponge.
RHS, the Royal Horticultural Society, notes that caladiums need a warm, humid environment but will rot in cold, wet soil. I link to them here because their guidance on tuberous plants is solid: RHS. The American Horticultural Society also emphasizes good drainage for aroids, which caladiums are. You can check their general care philosophy at AHS.
How to Get That Unique Texture to Pop
Texture on a caladium leaf is a combination of genetics and growing conditions. You can't change the genes, but you can make sure the plant expresses them fully.
Light is the biggest factor. Too little light, and the leaf expands to catch more sun. It becomes thin and flat. Too much direct sun, and the leaf scorches, which ruins the surface. Bright, indirect light keeps the leaf compact and thick.
Humidity matters, but not the way most people think. Misting does almost nothing for texture. It can actually promote fungal spots if you do it late in the day. Instead, I run a small humidifier nearby, or I group my caladium with other plants. A humidity tray filled with pebbles and water works fine too. Just don't let the pot sit in the water.
Fertilizer is a minor player. I feed once a month with a diluted liquid fertilizer, half the recommended strength. Too much nitrogen makes soft, floppy leaves. That's the opposite of texture.
My Exact Watering Rule (After Killing Three Plants)
I use the "lift and feel" method now. I lift the pot. If it feels light, I water. If it feels heavy, I wait. I also stick my finger in the soil up to the second knuckle. If it's dry, water. If it's even slightly damp, wait another day.
I never water on a schedule. Schedules kill caladiums.
In summer, that means watering about every 5 to 7 days. In winter, when the plant goes dormant, I stop watering almost entirely. The leaves die back. That's normal. I store the tuber in dry soil at around 60°F and replant in spring.
What About the "Textured Leaf" Long-Tail Varieties?
If you're searching for specific looks, here are three long-tail terms I've tested:
-
Caladium 'White Queen' textured leaf. This one has a papery white surface with green edges and red veins. The texture is more matte than puckered. It needs more light than red varieties to keep the white bright.
-
Caladium 'Red Flash' heart-shaped leaf. This is the one I grow now. The leaves are huge, heart-shaped, and have a slightly ruffled edge. The texture is thick and waxy.
-
Caladium 'Moonlight' ruffled leaf. This is a newer variety with a strong wave to the leaf edge. It's harder to find but worth it if you love that crinkled look.
I've also grown 'Aaron' and 'Candidum'. 'Aaron' has a smoother texture but a bold white center. 'Candidum' is more delicate and, honestly, a bit fussy. I lost that one to spider mites because I let the humidity drop too low.
Pests and Problems That Ruin Texture
Spider mites are the texture killer. They suck sap from the underside of leaves, leaving a stippled, dull surface. I check the undersides every time I water. If I see fine webbing, I rinse the leaves in the shower and treat with insecticidal soap.
Fungal leaf spot shows up as brown or black spots with yellow halos. That's from overhead watering or poor air circulation. I fixed it by watering at the soil level and running a small fan on low.
Dormancy is not a problem. It's a phase. When the leaves die back in fall, don't panic. Let the soil dry out. Store the tuber. Replant in spring. I used to think I killed it. I didn't. I just needed to let it rest.
Frequently Asked Questions
How often should I water a caladium with textured leaves? Water only when the top inch of soil is dry. In my experience, that's every 5 to 7 days in summer and almost never in winter. If you're unsure, wait another day. Overwatering is the number one killer.
Why are my caladium leaves losing their texture and color? Usually, it's not enough light. Move the plant closer to a bright window, but avoid direct afternoon sun. Also, check your fertilizer. Too much nitrogen makes leaves soft and plain. I use half-strength fertilizer once a month.
Can I grow a caladium textured leaf indoors year-round? You can, but most caladiums go dormant in winter. The leaves will die back even with perfect care. That's normal. Let the tuber rest in dry soil, then replant in spring. If you want year-round texture, try a variety like 'Red Flash' that sometimes keeps a leaf or two.
Final Thoughts
Growing a caladium textured leaf is less about doing more and more about doing less. Less water. Less fertilizer. Less fuss. Give it bright, indirect light, a pot with drainage, and a chunky soil mix. Then step back and let the tuber do its thing. I wish I had known that before I drowned three of them. Now I have a 'Red Flash' with leaves the size of my hand, and the texture is so deep it looks painted. You can get there too. Just don't love it to death.





