 bluename
 How to Grow Caladium Heart Leaf: Heart-Shaped Foliage Care Guide
I killed three caladiums before I figured out what I was doing wrong. Here's the short answer: caladium heart leaf plants need bright indirect light, consistently moist but never soggy soil, and a pot that drains fast. Get those three right and you'll have stunning heart-shaped foliage for months. Get them wrong and you'll watch those beautiful leaves turn to mush in about a week. I learned this the hard way, and this guide is everything I wish someone had told me before I spent money on plants I basically drowned.
Let me be honest with you. Caladiums have a reputation for being fussy, but I don't think that's fair. They're not fussy. They just have specific needs, and if you ignore those needs, they quit on you fast. Kind of like a cat that only drinks from a specific water bowl. Once you understand what they want, growing caladium heart leaf becomes almost effortless.
Why Caladium Heart Leaf Is Worth Growing
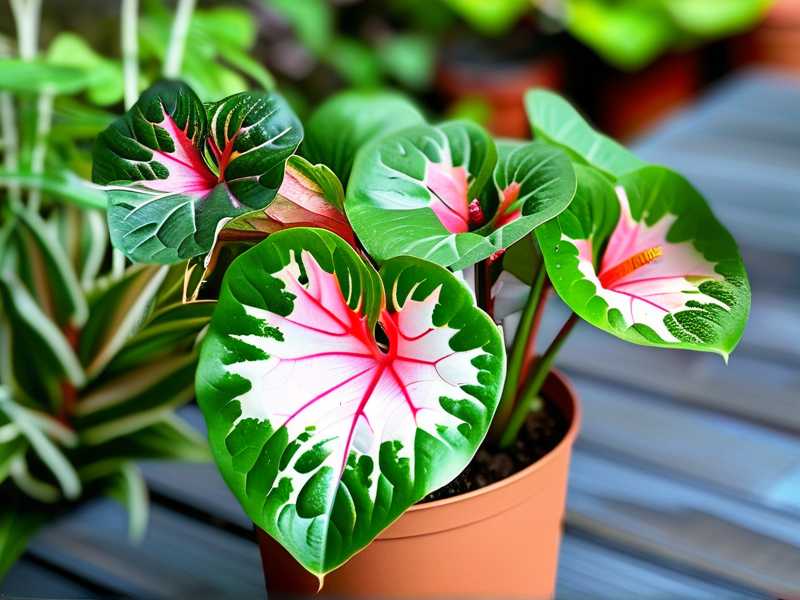
The heart-shaped foliage is the whole point here. Those papery, arrow-shaped leaves come in combinations of pink, red, white, and green that look almost painted on. I've had guests ask if my caladiums were artificial. That's how striking they are.
According to the Royal Horticultural Society (RHS), caladiums are tropical perennials native to South America, which explains why they love warmth and humidity. The American Horticultural Society (AHS) also notes that these plants grow from tubers, not bulbs or seeds, which changes how you plant and care for them.
Here's what most people don't realize: caladiums have a natural dormancy cycle. They grow like crazy from spring through early fall, then the leaves die back and the plant goes to sleep. First-time growers often panic when this happens and assume they killed the plant. I did exactly that my first year. Threw out a perfectly healthy tuber because I thought it was dead. Lesson learned.
The Three Mistakes That Kill Almost Every Caladium
I want to start here because these three errors account for the vast majority of caladium failures. And I've made all of them.
Mistake One: Overwatering
You've probably heard the statistic that 90% of indoor plants die from overwatering. I believe it, because I've personally contributed to that number. My first caladium got watered every single day because I thought more water meant more growth. Within ten days, the stems were soft, the leaves were yellow, and the tuber smelled like rotten potatoes.
Caladiums want soil that feels like a wrung-out sponge. Moist, not dripping. Not dry either. I know that sounds vague, but you develop a feel for it. Stick your finger about an inch into the soil. If it feels damp, wait. If it feels barely moist, water thoroughly until it runs out the drainage holes, then stop.
I also learned that caladiums hate sitting in saucers full of water. Empty the saucer within thirty minutes of watering. Every time. No exceptions.
Mistake Two: Wrong Light
I once placed a caladium on a south-facing windowsill because I read they like bright light. Technically true. But "bright light" doesn't mean "direct scorching sun for six hours." The leaves bleached out to a pale, washed-out color and the edges turned crispy brown. It looked like someone had taken a hairdryer to it.
The sweet spot is bright, indirect light. A few feet back from a sunny window. Or an east-facing window where they get gentle morning sun. If you're in a darker home, a grow light works fine. I use a simple LED grow light for about twelve hours a day during the growing season and my caladiums have been thriving under it.
But here's the thing. If the light is too dim, the colors fade. You'll get mostly green leaves with barely any pink or red. Still pretty, but not what you signed up for.
Mistake Three: The Wrong Pot
This one took me embarrassingly long to figure out. I kept using decorative pots without drainage holes. I told myself I'd be careful with watering. I wasn't. Water collected at the bottom, the roots sat in it, and root rot set in within two weeks.
Now I only use pots with drainage holes. Terra cotta is my go-to because it wicks away excess moisture. Plastic nursery pots inside decorative cachepots also work, as long as you take the inner pot out to water and let it drain completely before putting it back.
Size matters too. A pot that's way too big holds too much soil, which holds too much water. Caladium tubers prefer being slightly snug. A pot that's two to three inches wider than the tuber is plenty.
How I Plant Caladium Tubers Step by Step
The tuber looks like a dry, brown lump. Kind of ugly, honestly. But it's alive and ready to grow.
Step one. Soak the tuber in room-temperature water for about an hour before planting. This wakes it up. I skipped this step once and the tuber took nearly three extra weeks to sprout.
Step two. Fill your pot with a loose, well-draining mix. I use two parts potting soil, one part perlite, and one part peat moss. The perlite is non-negotiable for me. It keeps the soil airy and prevents the compaction that leads to soggy roots.
Step three. Plant the tuber with the knobby side, sometimes called the "eyes," facing up. Bury it about one to two inches deep. If you plant it upside down, it will still grow, but it takes longer and the stems come up crooked. I've done this. It's not fatal, just annoying.
Step four. Water lightly. Not a full soak. Just enough to settle the soil. Then wait. The first sprouts usually appear in two to four weeks, depending on temperature.
Step five. Keep the pot somewhere warm. Caladiums don't do much below 65°F (18°C). I keep mine around 70 to 75°F during the day. Bottom heat from a seedling mat speeds things up noticeably. I tried it last spring and my tubers sprouted in eleven days instead of the usual three weeks.
What Two Weeks of Proper Care Actually Looks Like
I want to walk you through what I observed during a recent two-week stretch with a new caladium I started in April. This is real, not hypothetical.
Day 1 through 3. Nothing visible above the soil. I kept the mix barely moist and the pot near a bright window.
Day 4. A tiny pale nub pushed through the soil surface. Barely visible.
Day 6. The nub unfurled into a small, rolled leaf. It was a pale green, almost translucent.
Day 8. A second sprout appeared. The first leaf opened fully and showed faint pink veins. This is when I started watering a bit more generously because active growth means active water uptake.
Day 10. A third sprout. The first leaf darkened and the pink became much more pronounced. I rotated the pot a quarter turn so the plant wouldn't lean toward the window.
Day 12. Fourth sprout visible. The plant now had four stems at different heights. I noticed a small fungus gnat hovering near the soil surface. Annoying but common when soil stays consistently moist. I let the top inch of soil dry out slightly between waterings for the next few days and the gnats disappeared.
Day 14. Five leaves total. Colors were vivid. The heart shape was clearly defined on each leaf. I was genuinely surprised at how fast the transformation happened once the tuber got going.
Those first two weeks taught me that patience in the beginning pays off. The tuber does most of its work underground before you see anything. Don't dig it up to check. I did that once out of impatience and snapped off a fragile sprout. Felt terrible about it.
Watering Caladium Heart Leaf Without Guesswork
Here's my actual routine during the growing season.
I check the soil every two to three days, not on a fixed schedule. This matters because watering on a schedule is how you end up overwatering in cool weather and underwatering in a heat wave. The plant doesn't care what day it is.
When the top inch feels dry-ish, I water slowly around the edge of the pot until water comes out the bottom. Then I stop. I let the pot drain completely before returning it to its saucer or cachepot.
In winter, when the leaves die back, I cut watering way down. The tuber is dormant and doesn't need much. Maybe a light watering once every three to four weeks just so the soil doesn't turn to dust. Honestly, some growers stop watering entirely during dormancy and store the dry tuber in peat moss. I've done both and both work.
Humidity and Temperature for Healthy Foliage
Caladiums come from tropical forests, so they want humidity. Forty to sixty percent relative humidity is ideal. Most homes sit around thirty to forty percent, which is a bit dry but usually manageable.
I run a small humidifier near my caladiums during winter when indoor air gets dry. In summer, I just group my tropical plants together, which creates a microclimate with slightly higher humidity. It's a simple trick that costs nothing.
Misting is controversial. Some growers swear by it. Others say it does nothing for humidity and can promote fungal issues on the leaves. I'm in the second camp. I stopped misting after I noticed brown spots forming on leaves that stayed wet too long. A pebble tray with water underneath the pot works better, and so does a humidifier.
Temperature-wise, keep them between 65 and 80°F. They hate cold drafts. I once left a caladium near an air conditioning vent for a weekend and the leaves curled inward like they were trying to protect themselves. Moved it two feet away and it recovered, but it took a week.
Fertilizing Without Burning the Roots
Caladiums aren't heavy feeders, but they do benefit from a gentle boost during active growth.
I use a balanced liquid fertilizer diluted to half strength. I feed every four weeks from when the first sprout appears until the leaves start to yellow in fall. That's it. More isn't better here.
The one time I used full-strength fertilizer, I got leaf tip burn. The tips turned brown and crispy. It wasn't fatal, but it looked ugly for weeks. Now I always dilute. Half strength, every four weeks. Simple.
Don't fertilize during dormancy. The tuber isn't taking up nutrients and the fertilizer just sits in the soil, which can cause salt buildup.
Pests and Problems I've Actually Dealt With
Aphids showed up on one of my caladiums last summer. Tiny green insects clustered on the undersides of new leaves. I caught them early and blasted them off with a firm spray of water, then followed up with insecticidal soap every five days for two weeks. They didn't come back.
Spider mites are another one. They thrive in dry conditions. The first sign is usually fine webbing near the leaf bases and a stippled, speckled look on the leaves. Increasing humidity helps prevent them. If you get them anyway, neem oil works. I apply it in the evening to avoid leaf burn from sunlight.
Fungus gnats are more annoying than harmful. They breed in consistently wet soil. Letting the top inch of soil dry between waterings usually solves the problem without any chemicals.
The biggest issue I see people face, though, isn't pests. It's root rot from overwatering. If your caladium's stems go soft and mushy and the leaves turn yellow all at once, unpot it immediately. Check the tuber. If it's firm and white inside, you caught it in time. Trim any rotten roots, repot in fresh dry-ish mix, and don't water for a few days. If the tuber is brown and mushy, it's gone. Start fresh with a new one.
Dormancy: Don't Panic When the Leaves Die
This is the part that trips up almost every new caladium grower. Including me. Especially me.
Around late September or October, the leaves start to yellow and droop. One by one, they die back until there's nothing left but soil and a hidden tuber. Your first instinct will be to think you killed it. You probably didn't.
Let the leaves die naturally. Don't cut them while they're still green because the plant is pulling energy back into the tuber for next season. Once the leaves are fully brown and dry, snip them off at soil level.
You can either leave the tuber in its pot, stored somewhere cool and dry, or dig it up and store it in a paper bag with slightly damp peat moss. I've done both. Leaving it in the pot is easier and works fine as long as the pot stays dry and doesn't freeze.
In spring, when temperatures consistently stay above 65°F, start watering lightly again. The tuber will wake up and send up new growth. Mine have come back reliably for three years now.
Frequently Asked Questions
How long do caladium leaves last?
Individual leaves last about two to three months during the growing season. The plant continuously pushes new leaves, so you'll have foliage from late spring through early fall. Once dormancy hits, all leaves die back and the plant rests until the next season.
Can I grow caladium heart leaf indoors year-round?
You can, but you need to respect the dormancy cycle. Forcing the plant to grow year-round exhausts the tuber. Let it rest for two to three months in winter with minimal water. It'll come back stronger in spring. I tried skipping dormancy once and the plant limped along with small, pale leaves all winter before dying in March. Not worth it.
Why are my caladium leaves turning yellow?
Yellow leaves usually mean overwatering. Check the soil moisture first. If it's soggy, stop watering and let it dry out. If the soil is fine and the yellowing happens in fall, it's probably natural dormancy starting. The timing matters here. Yellow leaves in July are a problem. Yellow leaves in October are normal.
Growing caladium heart leaf isn't complicated once you understand what the plant actually wants. Bright indirect light. Moist but not wet soil. A pot that drains. A warm spot with some humidity. And patience during dormancy. That's really it. I went from killing three caladiums to having them come back bigger every year, and the only thing that changed was paying attention to those basics instead of guessing. Pick up one tuber this spring and give it a shot. The heart-shaped foliage is worth it.





