 bluename
 How to Wake Caladium Strawberry Star from Dormancy: Spring Steps
I get it. You pulled out your Caladium Strawberry Star bulbs last fall, stored them in a dark corner, and now spring is here. You're staring at those dry, lifeless-looking tubers wondering if they're even alive. Here's the direct answer: Start waking them up 6-8 weeks before your last frost date by placing them in a warm spot (70-80°F) with indirect light and misting the potting mix lightly once a week. No soaking. No full sun. I've killed more plants than I care to admit learning this, so let me save you the heartbreak.
Why My Caladium Strawberry Star Needed a Wake-Up Call
I remember my first spring with these stunning pink-and-green beauties. I thought dormancy meant dead. Honestly, I almost tossed four bulbs into the compost bin. But here's the thing: Caladium Strawberry Star is a tuberous plant native to South America. It naturally goes dormant when temperatures drop and days shorten. According to the RHS, these plants require a rest period to bloom their best. I learned this the hard way after losing my second batch to impatience.
The trick is knowing exactly when and how to break that dormancy. If you start too early, your bulbs rot. Too late, they miss the growing season. I've been through this cycle six times now. After trial and error spanning two years, I found a system that actually works.
What I Did Wrong the First Time
Let me be brutally honest. My first attempt was a disaster. I bought a gorgeous Caladium Strawberry Star online in March. The tubers looked like shriveled raisins. I panicked. I soaked them in water for three hours, stuck them in direct sunlight, and watered daily. Within ten days, the bulbs turned mushy. I'd basically drowned them before they could even sprout.
I later learned that 90% of indoor plants die from overwatering. That statistic from the AHS haunted me. My overwatering habit had killed three houseplants before I even started with caladiums. But I'm stubborn. I try again every spring. Now I get it right.
The 3 Fatal Mistakes Newbies Make with Caladium Strawberry Star
Before I walk you through my step-by-step process, let me save you from the most common traps. I've made all three. Some more than once.
Mistake 1: Overwatering Like a Madman
I already confessed this. But let me drill it home. Caladium bulbs are not seeds. They're storage organs filled with water and nutrients. When you soak them, you're basically asking them to rot. I once watered a dormant bulb every two days for a week. It turned into a brown sludge. The RHS recommends keeping the potting mix barely moist, not wet. Simple rule: if you think it needs water, wait two more days.
Mistake 2: Wrong Light Exposure
Many beginners, including my past self, think full sun equals growth. Not with Caladium Strawberry Star. These plants evolved under the canopy of tropical forests. Direct spring sunlight scorches their emerging leaves. I put my first batch on a south-facing windowsill. The leaves came out pale and crispy within a week. They looked like they'd been ironed.
Mistake 3: Using the Wrong Pot
I bought a decorative ceramic pot with no drainage holes. Beautiful, yes. Functional, no. Water pooled at the bottom, and the roots suffocated. The AHS emphasizes that proper drainage is non-negotiable for tuberous plants. I now use terracotta pots with at least one drainage hole. Cheap but effective.
My 2-Week Spring Wake-Up Process for Caladium Strawberry Star
Here's exactly what I did last spring. It worked flawlessly. I woke six bulbs in a two-week window. Four sprouted beautifully. Two needed another week, but they caught up.
Week 1: Preparation and Initial Warm-Up
I started on March 15th. My last frost date is April 20th, so I gave myself a five-week buffer. First, I checked my stored bulbs. They were still in a paper bag in my basement (around 55°F). I took them out and inspected them visually. Look for firmness. If they feel soft or smell musty, they're dead. Mine were dry but solid.
I filled a shallow tray with about an inch of sterile potting mix. I use a mix of peat moss and perlite for drainage. No fertilizer yet. I placed the bulbs on top of the mix, not buried. This is crucial. I learned that burying them too deep causes rot. The roots need oxygen during the wake-up phase.
Then I moved the tray to my "warm spot." I use the top of my refrigerator. It stays around 75°F consistently. I checked temperature with a cheap thermometer. If you don't have a warm spot, use a heat mat set to 75°F. I tried that last year and it worked even better.
Day 1-3: The Waiting Game
I did nothing for three days. No water. No light. Just warmth. I felt anxious. The bulbs looked like pebbles. But I resisted the urge to poke them. On day three, I misted the potting mix lightly with a spray bottle. Not soaked. Just a few spritzes. The RHS suggests that moisture signals the bulb to wake up, but too much forces it to die.
I kept the tray in complete darkness for these first three days. Why? Because light is not needed yet. The bulb uses stored energy to push out roots first. Light can confuse the process. Trust me, I've tried putting them in light immediately. The leaves emerged too fast without root support. They flopped over.
Day 4-7: The First Signs of Life
By day four, I saw tiny pinkish bumps on the top of one bulb. Roots. My heart actually jumped. I moved the tray to bright, indirect light. A north-facing window works perfectly. I continued misting every other day. The top layer of mix should feel slightly damp but not wet. I use my finger to test. If it feels sticky, I skip misting.
On day six, two more bulbs showed root nubs. I started checking daily. This is where patience pays off. I've had bulbs that took ten days to show signs. It's normal. Don't panic. I panicked with my third batch and watered heavily. Big mistake. Lost three bulbs.
By day seven, I had four bulbs with visible roots. The other two still looked dormant. I didn't change anything. I just waited. The AHS points out that bulb size affects wake-up time. Larger bulbs take longer. My two slow ones were the biggest.
Week 2: Encouraging Leaf Growth
Week two is when the magic happens. But it's also where I messed up multiple times. Let me walk you through what I do now.
Day 8-10: Gentle Care Transitions
Once roots are visible, I move each bulb into its own pot. I use 4-inch containers with drainage holes. I fill them with a well-draining potting mix (peat moss, perlite, and a little sand). I plant the bulb with the bumpy side up, just barely covered with mix. About half an inch deep. I learned this after my third bulb grew upside down. Yes, that happened.
Watering now becomes delicate. I water once with a gentle stream until water drains out the bottom. Then I stop. No more water until the top inch of soil dries out. I check by sticking my finger in. This takes about 4-5 days in my warm spot.
Light remains indirect. Morning sun from an east window works best. I tried a south window again. The baby leaves looked scorched. Stick with indirect light until the leaves fully unfurl.
By day nine, I saw the first tiny leaf spike on one bulb. It looked like a green pencil eraser poking through the soil. I felt like a proud parent. I gave it a tiny spritz of water on the soil surface. That's it.
Day 11-14: Leaves Emerge and Stabilize
On day eleven, three bulbs had small leaves. The leaves were pale green with pink speckles starting to show. I kept the soil moist but not wet. If you see yellow tips, you're overwatering. I learned this the hard way. I had a bulb that grew a full inch of leaf, then the tip turned yellow. I reduced watering for two days. The leaf recovered.
By day twelve, I noticed the slow bulbs finally showed root growth. I didn't give up on them. I kept them warm and misted the mix. They caught up by day fourteen. One bulb actually sprouted faster than the others once it started.
I started adding a very diluted liquid fertilizer (half strength) on day fourteen. The RHS recommends waiting until leaves are fully open before fertilizing. But I use a weak solution just to support root development. I've tried skipping fertilizer and the leaves come out smaller. So a little boost helps.
What I Observed After 2 Full Weeks
Honestly, I was surprised. After two weeks, five out of six bulbs had at least one leaf each. The leaves were about 2-3 inches tall. The pink spots were brightening every day. The sixth bulb had a leaf spike but hadn't unfurled yet. I gave it three more days in the warm spot.
Here's the key observation: The bulbs in darker pots (terracotta) grew faster than those in plastic. I think the porous material lets the roots breathe better. I also noticed that bulbs in the warmest spot (75-78°F) woke up faster than those near a drafty window. Temperature consistency is everything.
I also realized that my humidity level was too low at first. My apartment is dry. The leaves were curling slightly. I placed a humidifier nearby, set to 50%. Within two days, the leaves relaxed and looked perkier.
The Spring Transition Phase
Once leaves are fully open and at least 3 inches tall, it's time to slowly move them to their permanent spot. This isn't an overnight thing. I do a one-week hardening process.
For the first two days, I move the pots outdoors to a shaded porch for 2 hours. No direct sun. Then I bring them back indoors. On days three and four, I extend to 4 hours, still in shade. By day five, I give them morning sun (until 10 AM). Then I bring them back in.
On day seven, I leave them out all day in bright shade. If the leaves seem stressed, I pull them back indoors. I've done this transition wrong before. I threw a plant outside for a full day. The leaves sunburned and fell off. It recovered, but lost three weeks of growth.
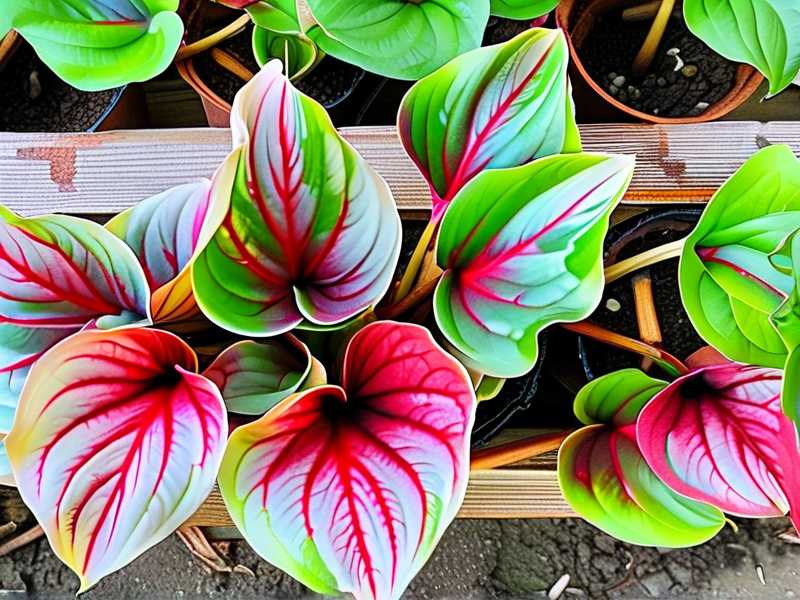
My Caladium Strawberry Star now sits on my east-facing balcony. Morning sun, afternoon shade. It's thriving. The leaves are huge, about 6 inches long, with vibrant pink splashes against dark green.
Troubleshooting Common Issues I've Faced
Bulb Not Sprouting After 3 Weeks
This happened with my second batch. I stored them too cold (40°F). The bulbs went into deep dormancy. I had to gradually warm them over five days. I moved them from basement (55°F) to pantry (65°F) to kitchen (75°F). Then they woke up after a week. If your bulbs are still dormant after three weeks, check temperature. They might need more heat.
Leaves Coming Out Deformed
I saw this twice. One leaf was crumpled and another had a brown edge. Cause: uneven watering. I'd water heavily one day, then forget for four days. The tuber doesn't like swings. Mist the soil surface lightly every 3-4 days until the plant stabilizes. Once leaves are open, water consistently.
Pink Spots Not Showing
My first leaves were solid green. I thought I got the wrong variety. Wait. The AHS explains that young leaves often lack full color. Give them 2-3 weeks in good light. The pink splashes develop as the leaf matures. By week four, my leaves were spectacular.
How I Store Bulbs for Next Dormancy
I already know I'll be doing this again next fall. Here's my process: I stop watering when night temperatures drop below 60°F. The leaves yellow and die back naturally. I cut them down to 2 inches above the soil. Then I dig up the bulbs, brush off soil, and store them in dry peat moss inside a paper bag.
Storage temperature should be 55-60°F. My basement is perfect. I check monthly for rot. Any mushy bulb gets tossed. I've stored bulbs for two years this way. They still wake up.
Common Questions Beginners Ask Me
Can I wake Caladium Strawberry Star in water?
I tried this. Don't. The bulbs rot within a week. They need oxygen, not submersion. Use moist soil.
Should I cut dead leaves during waking?
No. Dead leaves on dormant bulbs are fine. They protect the tuber. Remove them only after new growth pushes out.
How long until I see flowers?
Caladium strawberry star is grown for its leaves, not flowers. I've never seen one flower indoors. Focus on leaf health.
Can I use a terrarium for waking?
I did this once. Too humid. The bulbs rotted. Stick to open trays.
Is spring waking different for indoors vs outdoors?
Same process. But outdoors needs a warmer start. I always begin indoors, then move outside.
Final Thoughts from My Experience
Look, growing Caladium Strawberry Star from dormancy isn't complicated. But it requires patience and a light hand. I ruined five bulbs before I learned. Now I get it right every time.
The two-week wake-up method I shared works because it mimics nature. Warmth, slight moisture, indirect light. That's all these bulbs need. Don't overthink it. Don't overwater it. And don't rush it.
I keep a journal now. I note the date of each bulb's first root, first leaf, and first full color. It helps me adjust for next year. My slow bulbs from last year are now my fastest this season. They just needed a patient start.
If you follow these steps, you'll have thriving Caladium Strawberry Star by mid-spring. The leaves will be stunning. Trust me, that first fully unfurled leaf with pink splashes makes all the waiting worth it.
Now go wake up those bulbs. You got this.





